Tuesday, August 30, 2011

Oh So Nutty Chocolate Banana Bites

My new obsession is finding ways to make delicious deserts with fresh fruit, like the cheesecake stuffed strawberries, I wrote about here. This time, I decided to take on one of my other favorites, banana's!! I decided to make chocolate covered banana bites topped with nuts, for a little extra crunch!

This recipe was fun, easy and only 3 ingredients, my favorite kind! Check out the picture of my ingredients!

Ingredients:
  • 3 ripe banana's - serves 6 people (less than $2)
  • semi sweet chocolate pieces for melting ($2.98)
  • nut topping (Kroger brand -already crushed $1.98)
 Directions:
  • slice banana's into 1/4 inch to 1/2 inch bite size pieces
  • melt chocolate according to package
  • dip banana into melted chocolate until completely covered
  • place on parchment paper for cooling
  • while chocolate is still warm on the banana, sprinkle with the nut topping
  • let it sit in the refrigerator for about 30 minutes
  • serve and enjoy
While the oh so nutty chocolate banana bites cool in the fridge, it creates a hard candy like shell over the banana. When you bite into one of these little nuggets you get the crunch of the chocolate and the nuts and then all the flavor and softness of the banana! It is melt in your mouth, good!! Check out the final product, sorry about the crazy tooth picks I bought them on clearance at Pier 1 and they were the only ones I could find for serving time! Don't let my pictures scare you off, they DO NOT give these treats the justice they deserve!


Ariel view:

Thanks for reading! :)

Friday, August 26, 2011

DIY Card Box

For our wedding reception, (read about our DIY wedding here) I wanted to make a card box. Well with all of my other wedding projects to complete, by the time I realized I had not finished my card box we were only a little over a week away! Oh no!! I knew I didn't have time to use the actual boxes, and spend as much time decorating it as I had planned....how could I get this done?! I knew this project would require something that needed to be spray painted to beauty!

Unfortunately, this project was completed before The Inspired Collection was created so I do not have all the pictures of the separate pieces but I can share the final product with you and tell you how I created it. Check out our DIY card box:


I found this chest at Michael's and bought it for $14.99. It is about 16 inches long and about 12 inches tall. It could easily fit a large card, and I know that it could fit many. It was just wood and took 2 coats of spray paint to get a nice finish. I also got the flowers from Michael's too, I got the set of 4 for under $3.00. Our reception colors were black, white and yellow so they were perfect! I applied them using hot glue. I bought the sparkly letters from Hobby Lobby. I paid 50 cents for each letter, so a total of $2.50. These letters were so easy, they were just like stickers. I just stuck them on there and there it was, I had my card box. Made in under an hour for under 25 dollars!

The card box worked out great, and now we have a beautiful card box that we can hopefully use again. The hubs wants me to make one for him as a Tip Jar for his local shows. I think we can work something out....

Thanks for reading! :)

Love him....

Tuesday, August 23, 2011

Apothecary Love

I had to write a little special post about my love obsession with apothecary jars! I think they are amazing decorative pieces and can be used in so many ways to bring something different to any space or room. If it were up to me and my husband would let me, I'd have them in every room! But luckily he can show a little more restraint than me. I love all the different shapes,sizes, colors that these jars come in, and the endless possibility of fillers. Here's a few of the jars that I have used in my house to bring a little extra "something" to some of my favorite spaces in our house.

Below are some pictures of the apothecary jars that I have showcased in my kitchen. I have a lot of counter space, but I have a weird annoyance of seeing a counter top full of appliances. The only appliance I leave out on my counters is an electric wine opener (because it's pretty and well we love wine). I like my counter tops to be clean and hold a few key decorative elements, nothing overwhelming! In my apothecary jars in my kitchen, I wanted to use fillers that belonged in a kitchen. I used Lima beans, multicolor spiral pasta, and dog treats. My precious pup Zoe knows exactly where they are now, and will go and jump by that area of the counter until she gets one.


Love them, but I'm not done yet! I have a really tall decorative apothecary jar on my "bar" shelf/wall. I found these adorable balls at Old Time Pottery and thought that they totally matched my space and they fit the jar perfectly! I have my bar area decorated with my ikea wine racks, my recipe binder, and our beautiful decanter that was a wedding gift. I love the way the decanter looks with the apothecary jar. Check it out....


I recently finished my hutch remodel (read about here) and it was not going to be complete until I had added an apothecary jar. A while back I saw a big round jar, and I was determined to find one. I knew Michael's sold the exact one I wanted, but it was $30! No way!! Well I searched and just couldn't find the one that Michael's had to offer, I was about to give in and spend way more on it then I should, when a 40% off a regular price item coupon for Michael's miraculously arrived in my mailbox! SCORE! I headed the next day to pick up my jar. Now to decide what to fill it with, tiny acorns, pine cones, wine corks?! hmm...while trying to decide I stumbled upon these awesome mini moss balls! My entire downstairs is very organic feeling, this was perfect! I copped a few bags of those mini moss balls and my apothecary jar and headed home a happy camper.


Now, these are not apothecary jars but they are close. I got a beautiful glass cake stand and top and a trifle bowl as a wedding gift. And, although they are beautiful and I LOVE them to pieces, they are not the easiest items to store and they don't exactly get used everyday. I am not a big fan of people putting stuff on top of their fridges or maybe I am (because I love what we did), maybe I am just not a fan of junk up there. Anyways check out what we did to display these beautiful pieces as well as save ourselves a little storage room.

I filled the trifle bowl with some fake pears, and I scored the bird cage at an antique show, I absolutely adore the bird cage!

Cheers to falling in love over apothecary jars! Thanks for reading! :)

Monday, August 22, 2011

Fresh Mozzarella Bruschetta Heaven

One of my favorite summer appetizers and well appetizers overall is bruschetta. There are hundreds of bruschetta recipes out there, and trying to pick one is nearly impossible, so I decided to combine a few different ones to make my own! It turned out so delicious, I can not wait to make it again! Sorry about the pictures below, the lighting was not the best!


Ingredients:
  • 4 vine tomatoes
  • 1/2 Large Red Onion
  • Fresh basil
  • Balsamic Vinegar
  • Mozzarella pearls ( I had these left over from another recipe)
  • loaf of French Bread
Directions:
  • Seed the tomatoes and then dice
  • dice red onion into small pieces
  • chop the fresh basil
  • add balsamic vinegar, (only about 1 - 2 tablespoons)
  • chopped the mozzarella pearls into small pieces
  • Added all the bruschetta ingredients to a medium mixing bowl and tossed together. Put in the refrigerator for about 30 minutes to an hour before serving so all the flavors have time to come together.
  • Prepare the french bread, cut it into slices.
  • lightly brush each slice with olive oil and rub with a piece of garlic
  • bake at 350 for about 5 - 8 minutes or until lightly toasted
Once it is all prepared, it is ready to serve and enjoy. I believe it is one of the best summer appetizers to make! Yum!

Thanks for reading! :)

Saturday, August 20, 2011

Going Once, Going Twice, SOLD.....To My Hubs

Last week my husband and I attended our very first auction!! A friend of ours is a big fan of auctions, and him and his girlfriend had planned to go and check it out. When they told my husband about it he immediately knew I would love something like that. He later told me he had something planned for Saturday, I am pretty sure he wanted it to be a surprise, but I am the queen of finding out what I need to know and he broke down and told me! I was so excited, I spent the next few days watching Auction Kings on the Discovery Channel to get prepared. Well, nothing could really prepare me for the real thing.

The auction was only about 25 minutes North of our home and it was in a huge warehouse, with no a/c, in the middle of North Georgia no where.  We walked in and saw stuff lined all along the side of the walls, about 100 people, and directly in front of us was the auctioneer. He was speaking so fast I could barely understand him...it is real, they really do speak like that! I had only seen it in movies before.


Well, it didn't take me long to figure out the real reason why we were there. They were auctioning off a TON of music equipment. My husband is a musician and songwriter (aside from his real job) and so is his friend, they use to play together at local bars in college and now that they are both in the same town, they plan on playing together around here. While my hubs and his friend scoped out the music inventory, I sat and watched them auction off one thing after another, in awe of how crazy expensive some of the inventory was going for. They were auctioning off huge Coca-Cola signs for up to $7000 bucks...yes you read that right... SEVEN THOUSAND DOLLARS! I was starting to get a little nervous...how much is my hubs planning on spending here?!

The music inventory was up next, my husband had his yellow card in his hand ready to bid. Finally, the piece he was interested in came up, an amp, the auctioneer started out at $25...hubs raise his card, and then another person did...it went back and forth for a minute and I was on the edge of my seat..the auction then went up to $75, the hubs thew up his yellow card and finally the other man had backed down...SOLD to my hubs! I was so excited that he had gotten what he came for, and bought it at such an amazing price. Apparently what he bought retails on ebay for 300 to 500 dollars! Total Win! But, we weren't done yet, hubs friend still had to try to get the piece he was interested in, a mixing board. The bid's went back and forth a little longer than the hubs bidding war, but eventually he won his bidding war too! SOLD! He ended up paying $110 for the mixing board, that retails for about $1200 on ebay! Double Win!! Check out their lout.


Unfortunately, I did not get to see any of the furniture they were planning to auction off, I would of loved to see what type of prices it was all going for. Next time, we will make a day out of it and see if I can score anything amazing! But, I must say it was an amazing experience and I recommend that everyone go check one out! I know that I will be back for another!

Thanks for reading! :)

Wednesday, August 17, 2011

Better Than a Gift Bag

A couple of weeks ago my husband and I were invited to our neighbors to celebrate their little boys first birthday. My husband immediately put his foot down, we are getting him a football!! A football for a 1 year old?! I don't know about that dear. Luckily, I came across a foam Toy Story child's football before my husband went all man and bought the NFL version for a 1 year old! I knew I wanted to get him something else, and something a little more practical so I planned on keeping my eye out.

One day I went into Target and as soon as I entered the door I spotted the $1 isle. I love looking through there and seeing what you can find. I saw this bright blue bin for $1 and I fell in love with it. I immediately thought about the birthday party, and how awesome it would be to fill the bin up with some toys and decorate it so they can get a little use out of it, instead of just wasting wrapping paper or spending $5 on a bag that would probably be destroyed. I ended up buying the bin, and a cute brown and polka dot blanket for the little one, and a set of sippy cups!

Later on that week, I went into Michael's to pick up some scrap booking supplies to document our honeymoon. I also knew that I wanted to either paint an "E" (the first letter of the little one's name) or decorate the bin somehow. I came across the cute curly E, on sale for under a dollar. I immediately grabbed it, this would require no painting or decorating just a dab of hot glue to secure it, perfect!! I also picked up a clear bag for 99 cents, that I planned on putting the bin in and tying a ribbon around it. I almost had everything I needed....

The following day I went to Walmart to pick up the pictures that I had printed for my scrap book and noticed a ton of ribbon on clearance. I came across the blue, white, and brown striped ribbon on sale for a $1, SOLD! It was the perfect match! I now had everything I needed for the cutest gift bag, including the gifts!

Check out my supplies:


The finished product was definitely a crowd pleaser. I got a lot of compliments on it, and  I absolutely LOVED the way it came out! I loved the way it looked and I loved that I spent $4 dollars on it, probably the same amount if not less then what I would of spent on a gift bag and tissue. And now he has the cute bin to reuse! Check it out.


It turned out to be a great birthday for him, and he really enjoyed the cake! Look at this cutie pie!


Thanks for reading! :)

Monday, August 15, 2011

Drab to Fab: My Hutch Remodel

When I joined the blogosphere, I was in awe of all the fabulous remodel and refurbished projects. There were so many great projects and I wanted to be able to add my own project to that collection, but I did not really know where to start. Luck would have it that a family member was doing a slight remodel on their basement and they had a few pieces of furniture I could have for FREE!! Score! When I saw the hutch it screamed "I'm so outdated, please save me!" And save it I did......


When I got it home I took a good look at it, the wood was in pretty good shape but I did not care for the top glass doors. I knew those would not be used in my refab. I also wanted to update the hardware, I found the hardware I used at home depot and I just fell in love with it, then when I saw the price tag of $1.39 a pull, I knew it was fate! The hutch also had 18 wood plugs along the sides that looked like bolts. I found the exact size of the plugs that were in the original version of the hutch and I bought a set of 50 of them for under 3 dollars. I spray painted them black to match the hardware.

Anyways, check out these before pictures.


So, this being my first real overhaul I did not have all the proper equipment that I needed. My husband went with me to Lowes and helped me pick out an awesome palm sander, and a primer. That day I spent hours in the garage sanding the hutch. It took a while to get it sanded but once I was done, I did not want to hesitate. I spent 2 nights after work priming. Here are some pictures of the hutch all primed in its glory.


Once the priming was done, I decided it was time to pick out paint. I made another trip to Home Depot and finally landed on a color, Baja by Behr. I wanted something with a little color, a hint of beige or tan but nothing to dark. After the first coat, I was a little nervous about the color. I decided to give it a shot and put on the 2nd coat of paint. Sure enough, it grew on me and now I LOVE it!!

I knew that I wanted to either wallpaper or put fabric on the back of the upper cabinet. I remembered that I had this fabric laying around from when I had reupholstered our dining room chairs. Our living room/dining room is very open so I thought that this would help tie the two spaces together.

After a morning of thrifting and hitting a few garage sales, I dragged my mom with me to Michaels. We bought foam board and spray adhesive. I measured the back of the upper cabinet and we cut the foam board to size. We then sprayed the foam board with the adhesive and wrapped it in our cut fabric. Below is a picture of half of it inserted, and the finished product.


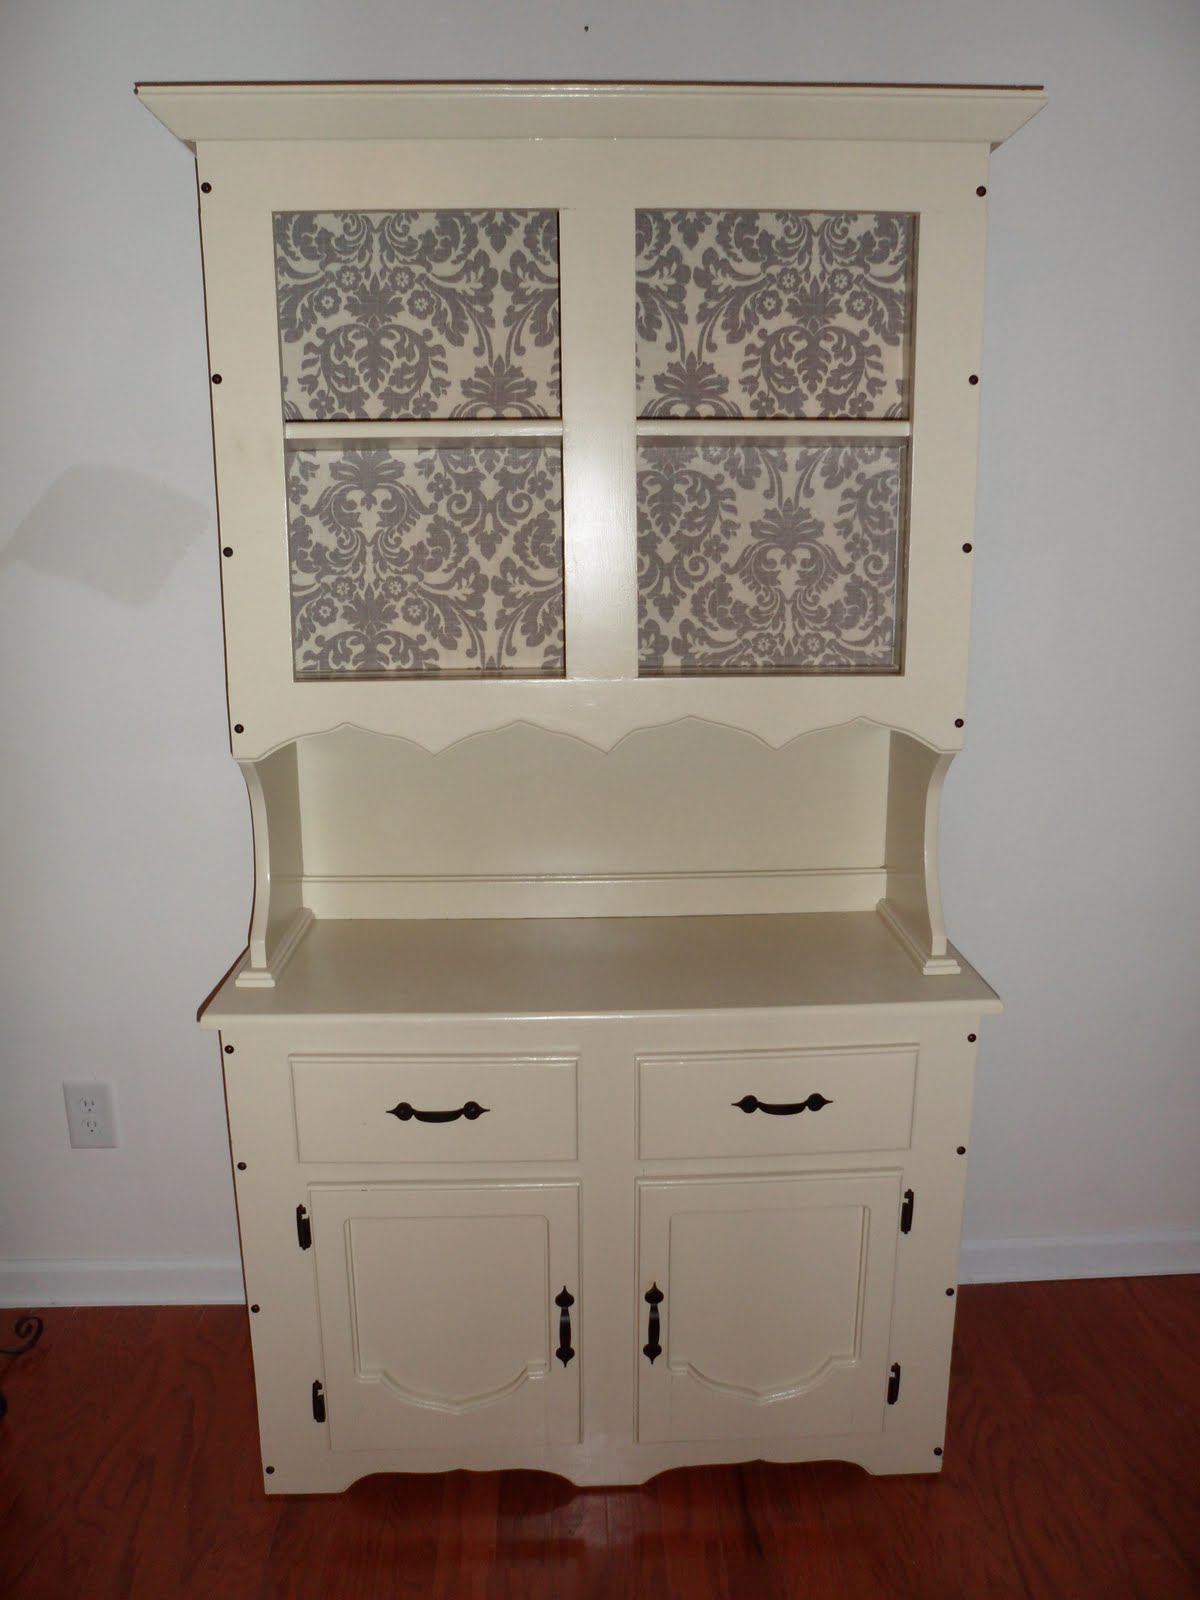
Well, after about two weeks of work I finished my first true overhaul and I absolutely LOVE the way it turned out! Special shout out to my hubs who helped me and taught me so much, and my mom for helping me install the fabric backing! I can not wait to do another one! Here are some more pictures I took of the final product, enjoy!!


(decorated with stuff around the house, this will probably change, but just to get an idea)


Thanks for reading!! 

Tuesday, August 9, 2011

Extreme Catering Challenge

Hi! I hope everyone had a great weekend! Ours was pretty eventful, luckily Friday night we got to enjoy a calm peaceful night at home, because the rest of the weekend turned into somewhat of a circus!
My husband had told me that his sister would be in town this weekend, I was excited to see her and that we would get to spend a little quality time with her since we have not seen her since the wedding. Well, she is an amazing musician and coaches/manages an all star marching band. It just so happened that they had a competition at a local high school, so they drove all the way up from Tampa Friday night, and arrived early Saturday. The kids practiced all day and had the competition that evening.

My sister-in-law wanted to give the kids a good meal, something they rarely get while they travel. Normally, they get bagged lunches, boring old ham and cheese, the kind of lunches you would get on a field trip when you were a kid. These kids were out practicing and working their butts off, they deserved a good meal! Oh, did I forget to mention we were feeding 110 teenagers, and we were preparing not one but two meals!!! Let the challenge begin.... So with a small budget, I believe around 250 dollars, my husband and sister-in-law ventured into a Wal-Mart (it takes a lot to get my husband to go into a Wal-mart, but they knew they had a strict budget and that would be their best option) to stock up on all the ingredients for the day!

So lets sum this challenge up:
Cost: 250 Dollars
Meals: 2 (lunch and dinner)
Mouths to Feed: 110
Challengers: Me, my husband, sister in law, and 2 of our friends(we called and asked them for help, they had no idea what they were getting into)


Ingredients:
  • 20 pounds of ground beef
  • taco seasoning
  • 20 pounds of chicken
  • 15 heads of lettuce
  • 4 bottles of Caesar dressing
  • tortilla chips for days
  • 12 bags tortilla wraps
  • salsa
  • bags of mozzarella cheese
  • shredded cheese
Challenge 1 : Nachos for lunch
We started cooking at about 9:45, lunch needed to be at the high school and served around 11:45. We had one team of people browning meat. we had multiple burners and skillets going. We had another team chopping up lettuce. We finished around 11:15 am and the hubs and my sister-in-law took the food to the kids. I got to stay home with my friends and catch a breather! We went and grabbed lunch for all of us, and met them back at the house for challenge 2.

Challenge 2: Caesar Wraps for Dinner
The men manned down the grill while the ladies were inside chopping up lettuce and mixing it with Caesar dressing in the big tin pans we had. I think it took 4 rounds on the grill to get all the chicken cooked. After each round they would bring a batch inside and me and the ladies would chop the chicken. After getting about halfway through the first batch our hands were already bothering us. Then a light bulb went off in my friends head, don't you have a food processor! oh Duh!!! So we chopped chicken in to big chunks and then threw it in the food processor for a pulse or two to get it chopped up nice and small! We ended up filling almost 2 large tin pans with chicken!! We finished just in time to meet the 4:45 deadline for dinner.

My husband and sister-in-law brought it and served it to the kid-o's. It was a huge success and they said the kids were so thankful to have a hot meal instead of those lousy old brown bags. All in all the day was a challenge, but we all rose to the occasion and knocked it out! We were happy with the outcome and even more impressed with our extreme catering skills.

Needless to say, I did not get around to much else this weekend. After that event, we went to a housewarming party for one of my best friends and by Sunday we were so tired. The hutch is now sanded and primed, I hope to paint it and get it all finished this weekend! Can't wait to share the final product! Thanks for reading! :)

Thursday, August 4, 2011

Create My Own Craft Room

I am currently longing for organization, a home for all my crafts, a place that is cozy, that I can call my "blogging home". My poor scrapbook materials hate me for being tossed in the garage in boxes and all of my gift wrapping materials and tools are spread throughout my house in different closets! How awesome would it be to have a craft room to call my own! A home for all my craft belongings, that is organized and clean and allows my imagination to run wild!!

Here's how I envision my craft room. Open, airy and bright! I love the pairing of green and yellow tones, they were our wedding colors and there is just something so fresh and light about those colors together. I envision plenty of shelving and storage for all my materials, a beautiful desk, graphic rug, and a cozy chair. Check out my mood board.


One. Martha Stewart Paint in Artichoke Heart
Two. White Desk
Three. Tan wing back chair
Four. White shelves with plenty of storage
Five. a DIY chalkboard with a white frame
Six. Graphic curtains (found these on etsy.com)
Seven. Flower hangers (Pier 1, $7.95)
Eight. Owl light fixture. (Anthropolgie $24.00)
Nine. White bookshelf
Ten. Graphic yellow rug
Eleven. Olive You Pillow, special meaning between my husband and I (also on etsy.com)
Twelve. Owl Door Stop (Pier 1 $19.95) I am obsessed with this and need it somewhere in my home
Here are some of my other inspirational craft rooms, and craft room ideas.

I love the table, and the wall paper. The colors of this room and materials seem so light, and of course I adore the color green!

Love the words! My husband thinks that I am addicted to them, and I probably am. They are just so cute no matter where you put them. I also love the bookshelf with the baskets!


All I have to say is, crafter's heaven!

I want this! So organized, ahh I can't wait to have mine all organized!

Finally! A solution to all my gift wrapping materials!

Hopefully one day soon I will be working on setting up my own craft room. When that day comes, I will share my journey with you and all my design ideas and dilemmas! I can not wait! Until then, thanks for reading!! 

Wednesday, August 3, 2011

Mini Spinach Dip Bites and Name Change

Last weekend my husband and I went to a friends house to celebrate their recent move to our area! Everyone brought apps and I decided to try something new. I have seen recipes for spinach dip bites on Pintrest but I really did not want to do too much baking or cooking ....I mean it was a Friday night and all I could think about was a nice tall drink!

So I decided to modify all these recipes and create my own that didn't require baking crescent rolls, fancy kitchen tools (all you need is a spoon and a baking pan), or actually making my own spinach dip, maybe someday I will but for this day I took the easy way out.

Ingredients
  • Phyllo shells ($1.98  a pack, each pack has 15 shells, I used 2 packs for 6 people)
  • Spinach and artichoke dip (Publix brand is my favorite, they sell it in the deli area price varies usually around $3.50)
  • Mozzarella/Parmesan Cheese (depends on if you use fresh or bagged)
Directions:
  • Fill the Phyllo shells with the dip
  • Top with Mozzarella and/or Parmesan Cheese
  • Bake according to phyllo shell package (I believe it is only about 8 minutes)
  • Serve.
Simple, and so easy, and only 3 ingredients! They were a huge hit, and the lightness and flakiness of the phyllo shell was perfect. There was no huge mess to clean up and the total time to prepare and cook was about 15 minutes! This is defiantly a quick and easy appetizer that is sure to wow your guests!


Sorry, it was a little dark when I took the picture

NAME CHANGE
I also decided to change the name of my blog to The Inspired Collection. I really wanted to feature some of my favorite recipes, and as I began writing and adding more blogs, I really did not feel like the title encompassed what this blog is really about. It really is a collection of my projects, my designs and my recipes. My husband and I brainstormed last night, and after tossing around a few ideas I settled with The Inspired Collection and I love it. I hope that my collection of crafts and DIY projects and recipes inspire you to try my ideas or create your own!! As always, thanks for reading and all the support!

Monday, August 1, 2011

Welcoming Wreaths

I came across this idea on, none other than Pintrest.  Here is a link to the blog where I got my inspiration Teach.Craft.Love. I fell in love with her adorable wreaths, and it just so happened I had a sad, undecorated wreath in my garage begging to be given new life. I also decided that these were just too cute and would be an awesome housewarming gift! One of my best friends just moved closer to us, and I knew she would love one, so I decided I would make one for her and one for us! Below is a picture of the materials that I used!

You will need:
  • wreath ( I paid $3.99 for each one at Old Time Pottery)
  • Spray paint - white (3.00 or less)
  • Numbers (.99 cents each at Michaels)
  • Fake flowers and/or ribbon
  • Floral wire
  • Glue gun
  • Glue sticks
I arranged the flowers and used floral wire to secure them in place. I spray painted the numbers white and let them dry. Once they were dry and the flowers were in place, I hot glued the numbers on and wah la! The floral wire is great to use because this will allow you to change out the floral and decorations to match the season. Check out my creations!!


I had a hard time picking the flowers for this project because summer is almost over and fall will be here before we know it. I decided to try to do something that I felt was transitional, and could last into the fall. I can't wait til Xmas comes around and I can replace the floral with poinsettias and berries! I may even spray paint the numbers silver!

On another note, this weekend my husband took me to Lowes to pick up some new power tools for my hutch remodel. I got an awesome palm sander and spend most of the day Sunday in the heat, and the garage sanding my hutch down, it is now ready for priming. Below is a before picture...coming soon I will feature the finished product!!


Thanks for reading!!