Tuesday, May 29, 2012

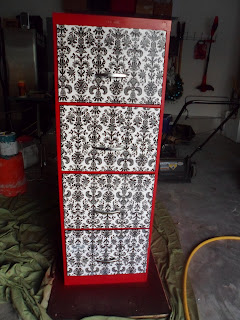
Totally Glam Filing Cabinet

Hi everyone! I know that it has been a while, but I hope that I still have some lovely faithful followers! I wish I had more time for my blogging and crafting, but life just seems to keep getting in the way! Anyways, I wanted to share with you my fabulous filing cabinet upgrade! I was in dire need of some sort of filing system that actually worked in my home. Anytime an appliance went haywire or broke..I was left scouring the drawers for user manuals and warranties. I decided that I had enough and needed to invest in a little something. Here is how I solved by problem, and it only cost me $40 bucks!

I scoured Craigslist for a filing cabinet. After a few failed attempts, I finally landed this 4 drawer metal filing cabinet for only $15 bucks! Sold, the hubs and I went and picked it up!

I ran to Michael's and made sure I had all of my supplies..
  • 2 cans of candy apple red spray paint
  • modge podge
  • black and white damask wrapping paper

That is literally all it took to get the job done, here are some before pictures:


I popped off all the hardware and threw on my domestic goddess blinged out gloves for some spray painting! I had to share with you!


I spray painted the top and sides and the front red. Once the paint was dry, I measured the front of the drawers, and cut my wrapping paper into the appropriate size, making it about 1/4" inch bigger so that there would be room to wrap around the drawer.

I put modge podge on the front of the drawer and placed my cut wrapping paper on top, and then modge podged over top of that. I did that for all four sides. I also wrapped the extra around the corners of the drawers.


Once all the modge podge had dried I carefully put my hardware, just the pulls, back onto the drawers. And in a matter of a few hours, and only $40 out of my pocket, I have a glammed out beautiful filing cabinet. I can't wait to have it all organized! Yes, organization makes me happy! Here's the outcome!


I hope you guys love it as much as I do! Thanks for reading! :)

Tuesday, April 10, 2012

Quick Frame Fix

I hope everyone had a lovely Easter weekend and got to spend lots of time with loved ones. The hubs and I did, and I got to spend some extra time crafting. This post is just a real simple quick fix that I came up with to help remedy an empty frame that was hanging out at the house, but I did not have a picture that size to fit it.

I bought about a dozen of these black frames in a couple different sizes from the dollar store to use at our wedding reception. Since then, they have just been scattered through my house, some painted and used on a gallery wall, gave some to my parents with the wedding pictures, and so on. Anyways I recently moved around and updated some pictures, but that left this 5x7 frame empty.


So, since I didn't have a photo or a matte I decided to just take a piece of scrapbook paper and make my own little matter. I used the back to trace the size and cut it out.


Then I just centered my picture on the paper, and voila..it's not perfect but it works and makes it a little cuter!


Sorry the pictures are so blurry, I took them with my iPhone Sunday morning while I was doing some Easter cleaning!

Thanks for reading! :)

Thursday, March 29, 2012

Dresser Upgrade - A Touch of Teal

A while back I shared this dresser that I picked up off of Craigslist for a cool $25 bucks, well after begging and pleading my husband to go get it after work one day it finally made its way to our garage... where it sat and sat and waited to be brought back to life. Here is what it looked like when I picked it up.

It had great bones, but as you could tell it was not in the best of shape. But I loved the feet and I loved the curves of the piece. I hated the chipped gold and the color, I even hated the pulls, and it had definitely become a drawing board for a kid or two in its lifetime.

So while the hubs was away at a bachelor party this weekend I enlisted the help of my mom, to help give me some motivation to get it done...you would think the fact that the hubs and I were dresser-less would motivate me more..but sadly it did not. So my mom gave me a quick kick in the rear and said lets just get it done...and so we did...


We went to home depot and picked out a paint color, there is a bit of teal in our new duvet set so I thought it would be fun to go that route. We picked out Pacific Teal by Behr.

It's fabulous!
We got home and went to work. I worked on sanding down the dresser, while she took off the pulls and sanded down the drawers.
After the sanding was complete, we went ahead and primed the entire dresser and let it dry for a couple hours. In the meantime we did some shopping, took the pups to the park and on a walk and picked up some frozen yogurt and just had a fun girls day! After all that we came home around 5 pm and painted the first coat! Then I had collapsed before 7 pm, all that pollen in the air and sanding really got to me..so a benadryll was calling my name.

The next morning my mom came over bright and early and we painted the second coat. With the 2 of us painting it did not take more than 30 minutes it was awesome, so much easier than when I did the hutch myself, read about that here.

We went and bought some groceries and went into Ross where I found some cute, owl paintings to hang in our room..yes I have the owl craze, see. But the colors were just too perfect I couldn't pass them up.


After killing a few hours, we came home to dry paint. My mom is so smart, she talked to me into keeping the original pulls, and she was right! They are perfect for the piece. We did not have to do anything to them but just clean them up a bit. So we reassembled the dresser just in time for the hubs arrival to move that bad boy upstairs!

Here's a closer look at the piece, before and after!


Hard to believe these are the same pulls and there has not been anything done to change them?!


I love the little claw foot on it, so pretty!!


Here is the duvet, that I bough a couple months back as a jumping off point for the room! You can see the blues in it! They match perfect, I cant wait to get the bedroom painted and have it all put together!

Thanks for reading! :)


Tuesday, March 13, 2012

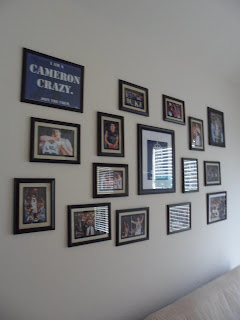
Duke Basketball Gallery Wall

Well in case you haven't heard my husband is a DIE HARD Duke basketball fan! I seriously don't think he has missed watching a game in over 3 or 4 years, he is that intense. But it is fun to watch them with him, especially when they are winning, and it has transformed me into a Duke fan. I mean seriously how could all of Coach K's and Dukes accomplishments not be inspiring?!
If you don't know basketball or watch it, then you wouldn't know that Duke lost the ACC tournament this weekend and it was a little bit of a blow. So in order to lift the hubs spirits on this big loss and in order to send some good Duke joujou out there, I created a Duke Basketball gallery wall for the hubs man room. This is his room and I normally do not involve myself in decorating it, because he says this is the one space that he has control over...and he's right...but he was obviously all in with this idea.

I found images online and printed them, and then we went to the dollar store and bought almost 20 frames, but since they were all a $1 whats the big deal right?! So this project cost us about 20 bucks and a little bit of time.

Here are some pictures of how it turned out....


 This is my favorite sign!! Duke fans are known as the Cameron crazies so I absolutely loved this and we made this the center of the gallery wall.

I bought this stoplight a couple years ago for Christmas, it is really cool!


It was so easy and cheap and you really could do it with any team. So here's an idea for your man if he is a die hard sports fan and has his own little man cave!

Thanks for reading! :)

Monday, March 12, 2012

Fabric Wall Art

I hope that everyone had a nice weekend! The hubs and I had a pretty laid back weekend, a little bit sad that Duke lost the ACC tournament, but we made up for it by making a Duke gallery wall for the hubs man room! I will share that this week! On another note, I finally did something with this huge blank wall that was driving me crazy!!

The stairs leading up to the second floor are open on one side with beautiful iron and wood railing, and the other side is just a huge blank wall! I didn't want to do a gallery wall because I had already done one in a hallway on the second floor, see that here, and we were putting one in the man room.  I knew I wanted something semi flat because I did not want it to get it the way of people walking up and down the stairs...a few months back I pinned this.... and thought it would be a good compromise. It is fabric wrapped foam board...


Well I had contemplated getting canvas and painting it with a stencil or wrapped with fabric, but I just hadn't found a fabric that I was in love with until Saturday...


Isn't that fabric AMAZING!!! and what it is even more amazing is that I paid $3.96 a yard. I bought 2 yards and that was plenty. I even have some left over for another project! Yay!


I bought 3 pieces of foam board from the Dollar Tree for $1 a piece and I already had spray adhesive to attach my fabric to the board. I bought Scotch picture mounts for $3.29. So I got three beautiful pieces of artwork for less than $15!!! AMAZING!!


Here is how they turned out...so cool right?!


Here is my boring stairwell before


and after....


Friday, March 9, 2012

And The Award Goes To

Michele over at That Mommy Blog was so sweet and awarded The Inspired Collection with The Liebster Award! The award is for still growing blogs! Yay, Thank you!


I wanted to share the experience so I am passing it on to 3 blogs that have less than 200 followers, that I really enjoy and I think that all of you will enjoy them too! If you have some time you should definitely go check out these inspiring blogs and the ladies who created them!

Hillary at My So-Called Home
Her blog is great and features her journey of transforming her house into a home. She has done some great renovations and has some great taste! Go check it out!

Jewels at Joy-N-Jesus
Her blog is fabulous! She blogs about everything from crafting to life lessons! Check out her blog to find some crating inspiration and some spiritual inspiration as well!

Nancy's blog is full of really fun projects! She is currently working on a nursery and she has some done some AMAZING renovations on their home! Be sure to check out the page of her home before and after!

I'm not really picky on the rules of this award, but if you feel like passing it on you can! This award should be given to blogs with less than 200 followers! I really just wanted to give these ladies some recognition for their amazing blogs and their inspiring talents!! Keep up the great work!

Thanks for reading!


Update on Craft Room

Well, I'd like to say my craft room is about 80% complete. We have painted and decorated, but I am still longing for a small TV and a little sitting area...but those things take money and we are working on not doing too many unnecessary spending right now...so maybe one day soon..

Anyways here's a little to catch you up to date...
The craft room was originally the room we let one of our friends stay in for a couple of years while he was finishing up college and once he was moved out I was ready to transform it, so I really had a blank slate to work from, besides the fact that painting it was a must...
Here is a little before...


Pretty boring... The red desk is originally from Ikea, and I have had it for years..to stay on a small budget I knew getting a new desk was not really in the cards, so I decided to keep this funky little red one and make it work.

We added some paint, but together them shelves, hung up curtains and some artwork...it is a little more presentable now...

view from the door way


 the red desk

Crafting bookcase holds fabric, magazines, my sewing machine, the bottom shelf is where I keep my cricut (not sure why it wasn't here when the picture was taken), the signed plate from my bridal shower, and displays the picture the hubs grandmother painted for us as a wedding gift. I got the 2 bookcases from Target, they were $19 a piece.

Ikea shelf I bought at a garage sale, I actually bought 2, but one was missing some of the party. It was still a good deal because this one was still in the box and had never been opened, it was brand new! I have glass apothecary's that I used at our reception that now hold my paint brushes and glue gun, and another one hols some of my ribbon.

I love these scissors I got them on clearance at Target, that door leads to the closet that is overflowing with more craft supplies...

View from my desk...that LARGE TV on the floor is the hubs, he is saying he will get it fixed one day..but hopefully one day that will be my sitting area and there will be a nice mini flat screen on the wall for my enjoyment :)

Love my keep calm and blog print that I framed...

Close up of the picture from the hubs grandmother, it is so pretty!

It's not totally there, but it definitely a thousand times better than it was before!

Thanks for reading! :)