Tuesday, May 29, 2012

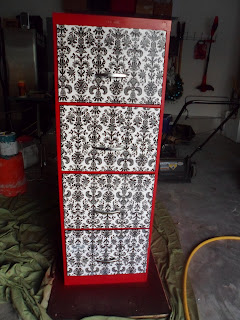
Totally Glam Filing Cabinet

Hi everyone! I know that it has been a while, but I hope that I still have some lovely faithful followers! I wish I had more time for my blogging and crafting, but life just seems to keep getting in the way! Anyways, I wanted to share with you my fabulous filing cabinet upgrade! I was in dire need of some sort of filing system that actually worked in my home. Anytime an appliance went haywire or broke..I was left scouring the drawers for user manuals and warranties. I decided that I had enough and needed to invest in a little something. Here is how I solved by problem, and it only cost me $40 bucks!

I scoured Craigslist for a filing cabinet. After a few failed attempts, I finally landed this 4 drawer metal filing cabinet for only $15 bucks! Sold, the hubs and I went and picked it up!

I ran to Michael's and made sure I had all of my supplies..
  • 2 cans of candy apple red spray paint
  • modge podge
  • black and white damask wrapping paper

That is literally all it took to get the job done, here are some before pictures:


I popped off all the hardware and threw on my domestic goddess blinged out gloves for some spray painting! I had to share with you!


I spray painted the top and sides and the front red. Once the paint was dry, I measured the front of the drawers, and cut my wrapping paper into the appropriate size, making it about 1/4" inch bigger so that there would be room to wrap around the drawer.

I put modge podge on the front of the drawer and placed my cut wrapping paper on top, and then modge podged over top of that. I did that for all four sides. I also wrapped the extra around the corners of the drawers.


Once all the modge podge had dried I carefully put my hardware, just the pulls, back onto the drawers. And in a matter of a few hours, and only $40 out of my pocket, I have a glammed out beautiful filing cabinet. I can't wait to have it all organized! Yes, organization makes me happy! Here's the outcome!


I hope you guys love it as much as I do! Thanks for reading! :)

Tuesday, April 10, 2012

Quick Frame Fix

I hope everyone had a lovely Easter weekend and got to spend lots of time with loved ones. The hubs and I did, and I got to spend some extra time crafting. This post is just a real simple quick fix that I came up with to help remedy an empty frame that was hanging out at the house, but I did not have a picture that size to fit it.

I bought about a dozen of these black frames in a couple different sizes from the dollar store to use at our wedding reception. Since then, they have just been scattered through my house, some painted and used on a gallery wall, gave some to my parents with the wedding pictures, and so on. Anyways I recently moved around and updated some pictures, but that left this 5x7 frame empty.


So, since I didn't have a photo or a matte I decided to just take a piece of scrapbook paper and make my own little matter. I used the back to trace the size and cut it out.


Then I just centered my picture on the paper, and voila..it's not perfect but it works and makes it a little cuter!


Sorry the pictures are so blurry, I took them with my iPhone Sunday morning while I was doing some Easter cleaning!

Thanks for reading! :)

Thursday, March 29, 2012

Dresser Upgrade - A Touch of Teal

A while back I shared this dresser that I picked up off of Craigslist for a cool $25 bucks, well after begging and pleading my husband to go get it after work one day it finally made its way to our garage... where it sat and sat and waited to be brought back to life. Here is what it looked like when I picked it up.

It had great bones, but as you could tell it was not in the best of shape. But I loved the feet and I loved the curves of the piece. I hated the chipped gold and the color, I even hated the pulls, and it had definitely become a drawing board for a kid or two in its lifetime.

So while the hubs was away at a bachelor party this weekend I enlisted the help of my mom, to help give me some motivation to get it done...you would think the fact that the hubs and I were dresser-less would motivate me more..but sadly it did not. So my mom gave me a quick kick in the rear and said lets just get it done...and so we did...


We went to home depot and picked out a paint color, there is a bit of teal in our new duvet set so I thought it would be fun to go that route. We picked out Pacific Teal by Behr.

It's fabulous!
We got home and went to work. I worked on sanding down the dresser, while she took off the pulls and sanded down the drawers.
After the sanding was complete, we went ahead and primed the entire dresser and let it dry for a couple hours. In the meantime we did some shopping, took the pups to the park and on a walk and picked up some frozen yogurt and just had a fun girls day! After all that we came home around 5 pm and painted the first coat! Then I had collapsed before 7 pm, all that pollen in the air and sanding really got to me..so a benadryll was calling my name.

The next morning my mom came over bright and early and we painted the second coat. With the 2 of us painting it did not take more than 30 minutes it was awesome, so much easier than when I did the hutch myself, read about that here.

We went and bought some groceries and went into Ross where I found some cute, owl paintings to hang in our room..yes I have the owl craze, see. But the colors were just too perfect I couldn't pass them up.


After killing a few hours, we came home to dry paint. My mom is so smart, she talked to me into keeping the original pulls, and she was right! They are perfect for the piece. We did not have to do anything to them but just clean them up a bit. So we reassembled the dresser just in time for the hubs arrival to move that bad boy upstairs!

Here's a closer look at the piece, before and after!


Hard to believe these are the same pulls and there has not been anything done to change them?!


I love the little claw foot on it, so pretty!!


Here is the duvet, that I bough a couple months back as a jumping off point for the room! You can see the blues in it! They match perfect, I cant wait to get the bedroom painted and have it all put together!

Thanks for reading! :)